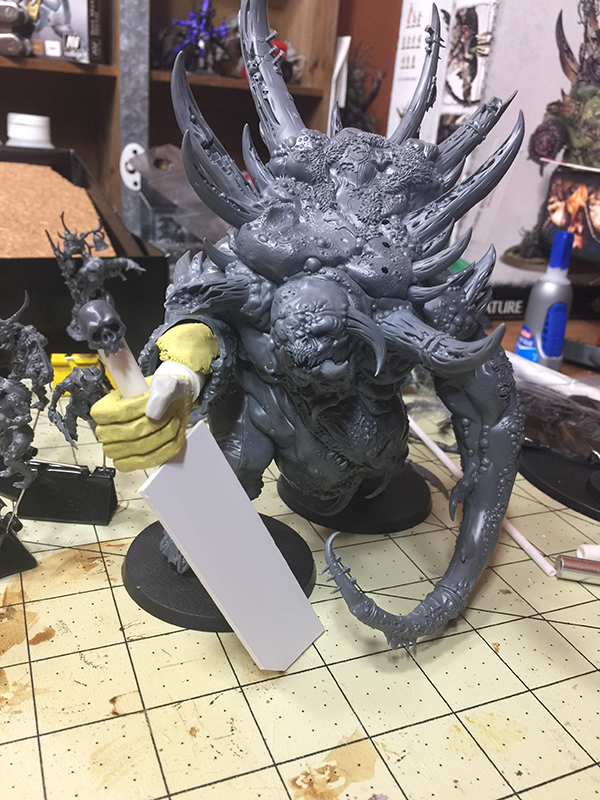
As promised, here's a breakdown of how I went about converting the Glotkin into a Great Unclean One!
I actually won the Glotkin model at Adepticon a couple years back as a prize from a Guidebook contest they were running. When I went to claim my prize, I was handed a giant box filled with individual minis in clampacks (think 40k heroes and Dropzone Commander ships and such) and was told I could pick one. Naturally, I dug down to the bottom of the box to see if there were any super-cool things hiding down there, and sure enough there was the Glotkin! I knew right then that I was going to turn him into a Great Unclean One, and an image formed immediately in my mind of the beasty holding a massive sword. That image is what I set out to create here.
When it finally came time to give this whole thing a shot, I built the kit according to the instructions with the obvious exception of the end of the lamprey arm, as you can see below, and added in a sort of skeleton made of styrene tube (I have TONS of it from my ork stuff!) to establish the positioning of the arm, hand, and sword.
Once the structure was established, I started bulking out the arm and hand with globs of Milliput. Milliput is nice for this as it's cheap and you can smooth it with water.
With the arm started, hobby ADD kicked in and I shifted over to working out the sword for a while. I was definitely thinking about Cloud's Buster Sword when I cut this thing out! I wanted a giant, fat, broken blade, and put the model up on some extra bases so I could have the sword actually extend below the base of the model... because that just felt cool. ;)
A blade that fat should probably be extra-thick the other way too, so I laminated three strips of card with to really bulk it out. Before that though, I split it lengthwise and added a channel in the middle by splitting and inverting a length of styrene tube in the center.
The blades edges were cut and filed with a bevel and I got out my French curve to design the crossguard. I drew out and cut half the crossguard from thick styrene card, then used that as a template to cut and mirror the rest of the pieces, then laminated those as well to thicken them up.
The blade in my mind had three rings on the face of it to form a Nurgle symbol, so out came the pipe cutter to slice up some styrene tube as uniform as possible. At this point though, I was on the fence between making these into sewer grates that were oozing grossness or possibly with worms squirming out of them, or stuffing skulls into them somehow.
Time for a bit more sculpting, this time with Apoxie Sculpt. This stuff is similar to Milliput in that it smoothes with water, but it's my favorite thing for filling in gaps on plastic models as you can feather it out super thin. I was filling gaps on other models at this point, so used it on this guy to make a thumb, bulk out the arm a bit, and to fill in stuff on the sword blade. I also decided to go with the skulls in the sword, because when GW puts out a box of several hundred skulls you tend to want to put them into everything. >,>
In the pic above, you can see that I've already wrapped the sword hilt in a strip of greenstuff, and at this point I really wanted to get that hilt seated into his hand permanently. So, I started skinning his hand in greenstuff, working from around the top where the hilt would make contact first. I also decided to make his nails out of styrene tube as I had it handy, it was the right shape, and it was super easy to do.
More greenstuff skin work. Everything added in this next pic was done in one go as I wanted to see just how much I could get done without before forced to stop in fear of wrecking something. I also decided at this point that the pinky finger was going to turn into a tentacle that would wrap around the hilt and hang over the front of the sword, because that just seemed too cool not to do.
All that was left at this point was to put it all together and finish up a few bits here and there, as well as add the pinky tentacle. I'm pretty sure I used a length of paperclip as an armature wire in there.
That's it! That last pic shows a few of the maggots I rolled out from greenstuff too. I did those will leftover blobs from the sculpting sessions, and let them cure on waxed paper so they were easy to pull up when they were cured.
Also, anyone looking to dive into sculpting with greenstuff should really look into grabbing up a set of silicone-tipped sculpting tools like these colour shapers. The silicone doesn't stick to the putty at all, so it's great for working on details.


